Australia
Round Five: WARWICK FARM
Sydney Grand Prix
Date: 14th February 1965
45 Laps of 3.621kms (162.945kms)
The first round in Australia, at Warwick Farm, opened with a sensational private practice session on the Friday in which Matich, Clark and Graham Hill all got below 1m 35s compared with the standing lap record of 1m 37.2s. McLaren and Phil Hill experimented with 13 inch tyres on the front, while Brabham found he was faster on Dunlops than the Goodyears on which he had to race. Levis shunted his black Brabham late in practice, and Leo Geoghegan battled on with what was thought to be influenza but which turned out to be pneumonia.
The start was dynamic, with Matich out-accelerating Clark and Hill, who passed him into Creek Corner. Clark lost third gear on lap 3, but stayed in second place with Matich third. Brabham passed Matich on lap 9, and by this time Davison, Phil Hill and McLaren had retired. Cusack, Geoghegan and Levis staged a fine fight back in the field, and Gardner retired on lap 26. This left Clark and Brabham chasing Hill, with Matich fourth and Stillwell fifth. Clark passed Hill on lap 34 as Brabham slowed markedly as his tyres wore down. Matich closed rapidly on Brabham, but was still eight seconds behind as the leaders started their last lap. Then Hill spun on Polo, and Brabham, Matich and Stillwell filed through to put Hill back into fifth place.
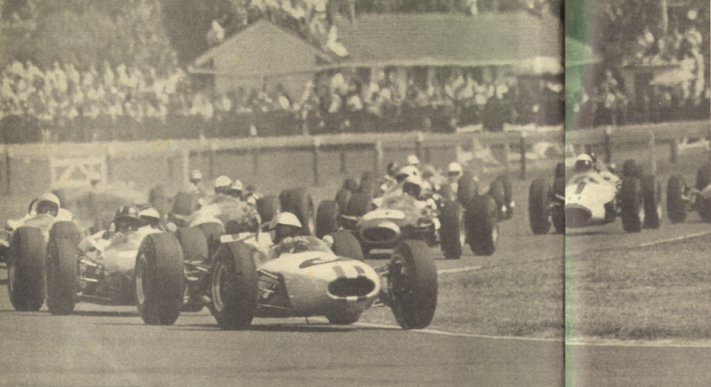
Frank Matich leading Graham Hill, Jim Clark
and Bruce McLaren into the first corner at Warwick Farm.
Grid: (* denotes pole)
Jim Clark
Graham Hill
Frank Matich*
Bruce McLaren Jack Brabham
Lex Davison Bib
Stillwell
Frank Gardner
Phil
Hill
Jim Palmer
Kerry Grant
Roly Levis
Greg Cusack
Rocky
Tresise
Leo Geoghegan
Glyn Scott
David Walker
Geoff McClelland
Barry Collerson
| Result | Driver | Nat | Car | Laps |
Time |
| 1 | Jim Clark | Scot | Lotus 32B / Climax 2499cc 4cyl | 45 | 1hr 11m 06.8s |
| 2 | Jack Brabham | Aust | Brabham BT11A / Climax 2499cc 4cyl | 45 | 1hr 12m 08.1s |
| 3 | Frank Matich | Aust | Brabham BT7A / Climax 2499cc 4cyl | 45 | 1hr 12m 13.5s |
| 4 | Bib Stillwell | Aust | Brabham BT11A / Climax 2499cc 4cyl | 45 | 1hr 12m 44.1s |
| 5 | Graham Hill | UK | Brabham BT11A / Climax 2499cc 4cyl | 45 | 1hr 12m 55.6s |
| 6 | Jim Palmer | NZ | Brabham BT7A / Climax 2499cc 4cyl | 44 | |
| 7 | Roly Levis | NZ | Brabham BT6 / Ford 1495cc 4cyl | 43 | |
| 8 | Leo Geoghegan | Aust | Lotus 32 / Ford 1498cc 4cyl | 43 | |
| 9 | Rocky Tresise | Aust | Cooper T62 / Climax 2495cc 4cyl | 42 | |
| 10 | Greg Cusack | Aust | Brabham BT6 / Ford 1495cc 4cyl | 42 | |
| 11 | David Walker | Aust | Brabham BT6 / Ford 1495cc 4cyl | 41 | |
| 12 | Glyn Scott | Aust | Lotus 27 / Ford 1495cc 4cyl | 41 | |
| Ret | Frank Gardner | Aust | Brabham BT11A / Climax 2499cc 4cyl | 26 | Engine |
| Ret | Kerry Grant | NZ | Brabham BT4 / Climax 2495cc 4cyl | 15 | Oil Pressure |
| Ret | Barry Collerson | Aust | Brabham BT6 / Ford 1495cc 4cyl | 12 | Mechanical |
| Ret | Bruce McLaren | NZ | Cooper T79 / Climax 2495cc 4cyl | 10 | Piston |
| Ret | Geoff McClelland | Aust | Brabham BT6 / Ford 1495cc 4cyl | 9 | Overheating |
| Ret | Phil Hill | US | Cooper T70 / Climax 2499cc 4cyl | 9 | Suspension |
| Ret | Lex Davison | Aust | Brabham BT4 / Climax 2495cc 4cyl | 4 | Broken Steering |
Fastest Lap: Jim Clark 1mk 33.7s (Record)
Round Six: SANDOWN
Sandown Park 100
Date: 21st February 1965
54 Laps of 3.103kms (167.562kms)
Sandown, tragically, was marred by the death of maestro Lex Davison in practice. Jack Brabham, with new "sticky" Goodyears hot from the moulds, took out his third Sandown Cup to the enormous enthusiasm of a partisan crowd. He won 50 bottles of champagne for putting up pole position lap of 1m 8.8s. The Gardner Brabham failed to arrive for practice after being damaged in a trailer accident on the trip down from Sydney.
Graham Hill's car had been fluffing badly with magneto trouble, but McLaren and Phil Hill were very happy with their new 13 inch hand-cut ultra-low profile Firestones. Matich got off the line ahead of Clark again, but the Scot nipped in front of him going into Shell Corner. Then Brabham, McLaren, Phil Hill and finally Graham Hill got by Matich, and on lap 7, Brabham shot by Clark on the back straight. Matich stopped on lap 8 with a broken rotor button, and the race settled into three distinct fights, Brabham and Clark for the lead, the two Hills, McLaren and Stillwell for another, and the third between Gardner and Palmer. Stillwell, driving exceptionally well, passed the two Coopers into fourth and moved into third when Graham Hill retired on lap 35. Clark had led for four brief laps before being pushed back to second place, and on lap 38 Stillwell's car started to misfire badly with magneto trouble. Phil Hill went up to third, McLaren slowed with heat fatigue, and Jack Brabham continued to lead, taking the race by 4.6 seconds.
Grid: (* denotes pole)
Frank Matich
Jim Clark
Jack Brabham*
Bib Stillwell Bruce
McLaren
John McDonald Graham Hill
Phil Hill
Jim Palmer
Kerry Grant
Keith Rilstone
Wally Mitchell
Roly Levis
Frank Gardner
| Result | Driver | Nat | Car | Laps |
Time |
| 1 | Jack Brabham | Aust | Brabham BT11A / Climax 2499cc 4cyl | 54 | 1hr 2m 57.7s |
| 2 | Jim Clark | Scot | Lotus 32B / Climax 2499cc 4cyl | 54 | 1hr 3m 02.3s |
| 3 | Phil Hill | US | Cooper T70 / Climax 2499cc 4cyl | 53 | |
| 4 | Bruce McLaren | NZ | Cooper T79 / Climax 2495cc 4cyl | 52 | |
| 5 | Jim Palmer | NZ | Brabham BT7A / Climax 2499cc 4cyl | 51 | |
| 6 | Bib Stillwell | Aust | Brabham BT11A / Climax 2499cc 4cyl | 51 | |
| 7 | Roly Levis | NZ | Brabham BT6 / Ford 1495cc 4cyl | 49 | |
| 8 | Wally Mitchell | Aust | Lotus 18 / Ford 1495cc 4cyl | 50 | |
| 9 | Keith Rilstone | Aust | Elfin / Ford 1495cc 4cyl | 44 | |
| Ret | John McDonald | Aust | Cooper / Climax 2495cc 4cyl | 43 | Engine |
| Ret | Graham Hill | UK | Brabham BT11A / Climax 2499cc 4cyl | 35 | Overheating |
| Ret | Frank Gardner | Aust | Brabham BT11A / Climax 2499cc 4cyl | 32 | Engine |
| Ret | Kerry Grant | NZ | Brabham BT4 / Climax 2495cc 4cyl | 18 | Engine |
| Ret | Frank Matich | Aust | Brabham BT7A / Climax 2499cc 4cyl | 10 | Rotor Button |
| DNS | Lex Davison | Aust | Brabham BT4 / Climax 2495cc 4cyl | Fatal Accident |
Fastest Lap: Jack Brabham 1m 8.6s
Round Seven: LONGFORD 30th Australian Grand Prix
Date: 1st March 1965
26 Laps of 7.242kms (188.292kms)

Longford saw the McLaren cars come resoundingly into their own with good short-stroke engines and the small frontal area and shallow tread of the Firestones on this ultra-fast circuit. McLaren and Brabham staged a thrilling battle for pole position and 100 bottles of champagne on the Friday, with McLaren finally making it with a shattering 2m 18.5s lap. McLaren won the 10 lap qualifier on the Saturday from Brabham and Graham Hill and lap times from this set the grid for the Grand Prix.
From the start, McLaren was first away, joined by Graham Hill on the outside. Brabham came between them and soon edged ahead of Hill. Clark, Matich, Stillwell and Phil Hill all followed very closely behind. This group soon pulled away from Levis, Jane and Scott, with Tresise behind, beginning to get the Cooper-Climax wound up ready to find a way past the smaller cars. Jane moved past Levis, then, as they passed the pits, Tresise moved out to take Levis as well. As he did, the Cooper went out of control, crashing through a fence, killing the young driver immediately.
After three laps, McLaren led from Brabham, Hill and Clark, who was suffering from a miss-fire under full revs. This allowed Phil Hill to pass him. By the end of four laps, Grant, Jane and Archer were all out. Clark got back in front of Hill, only to be re-passed again. This occurrence was to take place numerous times throughout the race. Just before half distance, the front suspension collapsed on Matich's car and he was lucky to be able to keep the car under control until bringing it to a stop.
As Brabham was passing Levis, going into Mountford corner, Levis suffered a brake lock up and connected with Brabhams wheel. As a precautionary check, Brabham called into the pits, and returned to the race back in fifth position, just ahead of Stillwell, but behind McLaren, Graham Hill, Phil Hill and Clark.
Brabham began recording record shattering laps in his endeavour to regain his spot. McLaren responded and on lap 17 set a new record time of 2m 18.4s. With nine laps remaining, everyone sensed the urgency as Brabham began to appear in their mirrors. Jack passed Clark and was now right behind Phil Hill. Jack passed Phil, but was immediately re-passed by Phil, who set a new record lap of 2m 18.2s in doing so. Jack responded once more and passed Phil with a new lap record of 2m 18.0s, a time that was never ever beaten on the Longford track.
Meanwhile up at the front, McLaren was having clutch trouble and his lap times began to drop. Phil Hill wasn't finished yet and needing to help defend his team leaders position, he once again took Brabham and followed this by passing Graham Hill as well. Brabham also took Graham Hill and with three laps to go, McLaren was holding on, with Phil Hill trying to hold off Brabham. This he could not do and Brabham was now in second. McLaren was changing gears without a clutch and survived to win by only 3.3 seconds. This must surely go down as one of the best Australian Grand Prixs ever.
Grid: (* denotes pole)
Graham Hill
Jack Brabham
Bruce McLaren*
Frank Gardner
Jim Clark
Phil Hill
Bib Stillwell
Frank Matich
Rocky Tresise
Jim Palmer
Bob Jane
Jack Hobden
John McDonald
Mel McEwin
Roly Levis
Glyn Scott
Kerry Grant
Lyn Archer
| Result | Driver | Nat | Car | Laps |
Time |
| 1 | Bruce McLaren | NZ | Cooper T79 / Climax 2495cc 4cyl | 26 | 1hr 1m 10.9s |
| 2 | Jack Brabham | Aust | Brabham BT11A / Climax 2499cc 4cyl | 26 | 1hr 1m 14.2s |
| 3 | Phil Hill | US | Cooper T70 / Climax 2499cc 4cyl | 26 | 1hr 1m 15.8s |
| 4 | Graham Hill | UK | Brabham BT11A / Climax 2499cc 4cyl | 26 | 1hr 1m 18.8s |
| 5 | Jim Clark | Scot | Lotus 32B / Climax 2499cc 4cyl | 26 | 1hr 1m 19.3s |
| 6 | Bib Stillwell | Aust | Brabham BT11A / Climax 2499cc 4cyl | 26 | 1hr 2m 25.1s |
| 7 | Jim Palmer | NZ | Brabham BT7A / Climax 2499cc 4cyl | 26 | 1hr 2m 27.2s |
| 8 | Glyn Scott | Aust | Lotus 27 / Ford 1495cc 4cyl | 23 | |
| 9 | Roly Levis | NZ | Brabham BT6 / Ford 1495cc 4cyl | 23 | Accident |
| 10 | Jack Hobden | Aust | Cooper / Climax 2200cc 4cyl | 22 | |
| 11 | Mel McEwin | Aust | Elfin / Ford 1500cc 4cyl | 20 | |
| Ret | John McDonald | Aust | Cooper / Climax 2495cc 4cyl | 21 | Mechanical |
| Ret | Frank Gardner | Aust | Brabham BT11A / Climax 2499cc 4cyl | ||
| Ret | Frank Matich | Aust | Brabham BT7A / Climax 2499cc 4cyl | 5 | Suspension |
| Ret | Lyn Archer | Aust | Elfin / Ford 1500cc 4cyl | 4 | Mechanical |
| Ret | Bob Jane | Aust | Elfin / Ford 1500cc 4cyl | 4 | Gearbox |
| Ret | Kerry Grant | NZ | Brabham BT4 / Climax 2495cc 4cyl | 3 | Engine |
| Ret | Rocky Tresise | Aust | Cooper T62 / Climax 2495cc 4cyl | 1 | Fatal Accident |
Fastest Lap: Jack Brabham 2m 18.0s (Record)
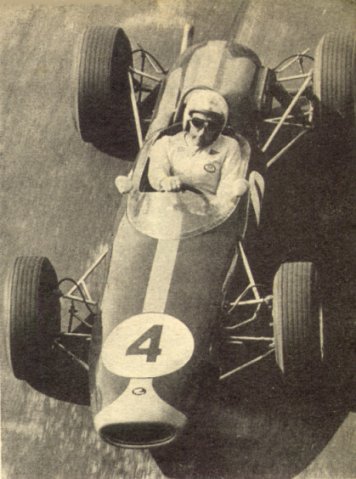
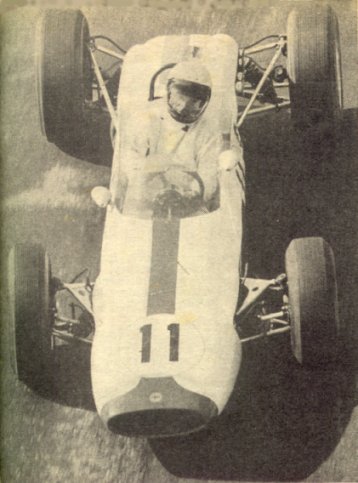
Images of driver styles under Longford
Viaduct.
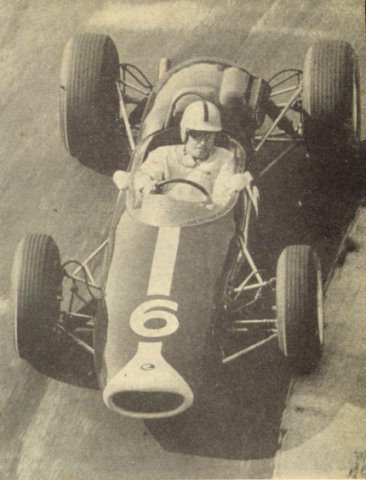
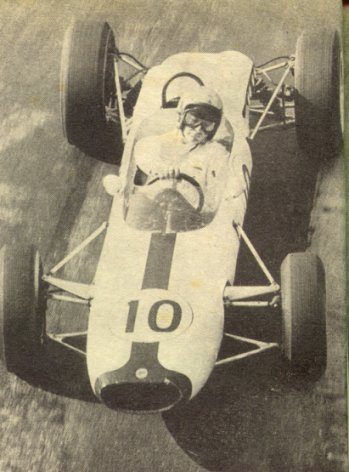
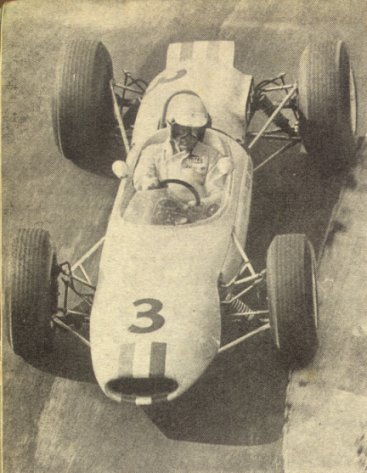
Frank Matich
Jack Brabham
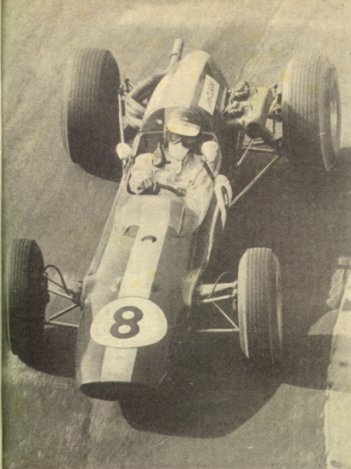
Jim Clark
Phil Hill